You’ve finally gotten to the stage where you have drawn up your guest list and have received the RSVP’s and now you need to figure out who and where to seat them.
… ‘but where you put you’ #harrypotter 
Keep reading to find out my 3 tips to creating your seating plan and well as my personal method.
-
Table Style
The first thing you need to decide is what table style you think would best fit you and your guests. This would be decided prior to booking your venue or hiring furniture.
Are you wanting grouped round or square tables or maybe 2 long banquet style tables or multiple tables lines in a row? Knowing the table style as well as the floorplan of the venue/room/marquee is very important so as to decide how many guests can sit at one table.
BONUS TIP: Ask your venue for a floorplan printout so it will make it easier for you to map out your reception.
-
Group Guests into Categories
Next step is to group your guests into categories such as:
>Bridal party
>Immediate family
>Family
>Friends
>Work Colleges
>Partners of bridal party
>Kids
>Etc
Consider grouping guests on who knows who especially for the single guests or partners of the bridal party as I’m sure you’d feel quite uncomfortable at a table where you didn’t know anyone.
Also consider having a kids table with activities to keep them occupied. This is especially good for during the speeches as this is generally a long period of time and the activities can keep them entertained.
-
Seat VIP Guests First
By seating your VIP’s first gives you a rough idea of the layout you are wanting for your reception. Depending on the couple, VIP’s will generally be the bridal party and their parents. Do you want both your parents at the same table or at different table to accommodate the other member of the family? It’s totally up to you.
-
The Post-It Method
So how I map out a seating plan is I would have in front of me the guest list which I have colour coded their names into the categories. I also have in front of me a copy of the floorplan of the room/venue with the tables drawn in as well as any other features e.g. bridal table, bar, cake table, gifts table photobooth, etc. So, I know how much room I have to work with.
Next I grab my trusty Post-It notes (You can either get the small think ones like I do or simply cut the normal sized ones into strips so that each one has a bit of the sticky end … this is important.)
Each coloured sticky note represents the coloured category e.g. work colleges and the names of the guests on them. I then start sticking the named Post-Its where I would like to seat them on the floorplan. The great thing about using
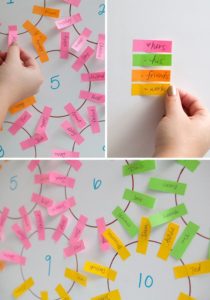
this method is that it’s super easy to swap them around until you’re happy with the placements.
Remember to also factor in the maximum number of seats that can be placed at one table.
Once you’re happy with the result take a picture of it just in case some of the Post-Its loose their sticky and fall off. Then I like to make a final typed version, or you can just hand right on the floorplan itself.
And then YAY you’re all done and ready to send this onto your Wedding Planner or venue coordinator.
Also don’t forget to click the link below to download our free Wedding Timeline Checklist. It’s FREE!
Happy planning. Janette xx
Written by Janette Newell I Olive Rose Weddings & Events
Post It note picture credit from https://www.pinterest.com.au/pin/121737996157769919/?lp=true